HowTo: Team Foundation Server and xUnit

For quite some time I have been doing TDD and Continuous Integration (CI), both in my private projects as well as my professional ones. My preferred unit testing framework is xUnit and I recently had to set this up with Team Foundation Server (TFS) to do CI. It turned out this was not a trivial task. One think was to get TFS to run the tests, another was to get TFS Reporting to work and show the test results. This blog post will show the different steps I took. I hope it will be an inspiration to others and help them avoid some of the issues and fustrations I ran into. Any comments or feedback will be greatly appreciated.

First step is to install TFS 2010. The following will describe how to install it on Windows Server 2008 and SQL Server 2008. However, the steps are the same for Windows Server 2008R2 and SQL Server 2008 R2.

I will not go into great details of how to install the server products. There are already great guides available on the web, so please drop me a mail og reach me on twitter if you require assistance with this part of the process.

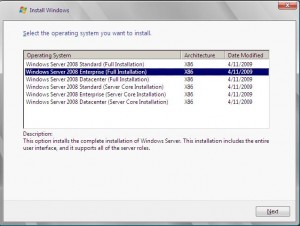
Install Windows Server 2008 (Enterprise) on a server and apply Service Pack 2 (SP2).

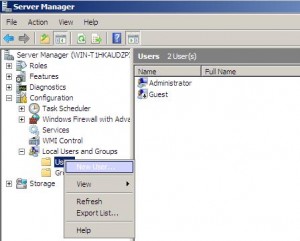
Create a User named, e.g. TFS and add this user to the Administrators group.

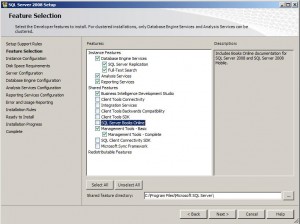
Install SQL Server 2008 (Enterprise Edition) with all components. I’ve also selected to install the Business Intelligence Development Studio, which will allow me to create TFS Reports.

Install Reporting Services in Native mode, but select the option of NOT configuring the Reporting Services now. Do not install it in SharePoint Integrated mode.

Add the TFS user as Login to the SQL Server just installed.

Install WSS (Windows Sharepoint Services) 3.0 and Service Pack 2. Do not run the Configuration Wizard at the end.

At this point you should be able to see the default SharePoint site at http://localhost.

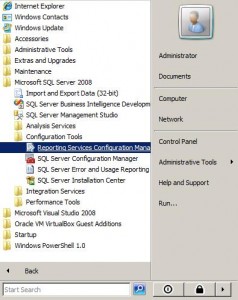
Open the SQL Server Reporting Services Configuration Tool and configure the Reporting Services now.

The tool will take you through the configuration step by step and will allow you to specify User, Create database etc. When asked for user credentials specify the User created earlier.

When configuring the Database keep the default setting to Native Mode when asked for Report Server Mode.

When the configuration has completed it should be possible to see the Reporting Service Portal and Web Service, e.g.  on http://localhost/Reports and http://localhost/ReportServer.

Now it is time to install TFS. Initiate the installation and select the features you wish to install, most likely all but the Team Foundation Server Proxy.

You properly need to restart the server during the installation – after all this is Microsoft – but otherwise the installation should run smoothly.

Once done, press the Configure buton, to launch the Configuration Tool. Select the configuration appropriate to your needs. I selected the Standard configuration for this lab.

When asked for the Service Account, enter the user you created previously.

If you are not able to pass all the verification checks, just correct then and re-run the verification. Once all is green, you should be able to complete the configuration.

If you want to read more about TFS, check out the blog posts by Richard Banks and Ewald Hofman.

You now have a running TFS, but we are far from finished. To finish what we set out to do we now have to create and modify a build configuration.

A disclaimer: the following example will have some hardcoded values. The correct way to do things would be to create a custom action, put it in TFS and refer this, but this I will leave
for another post.

In order to run our unit tests using xUnit and publish the results, we need to copy to items to the TFS server: xUnit and NUnitTFS.

I placed then in C:\Tools\. Do not put any spaces in the folder names; this will make your life easier later on.

A little tweaking is most likely required of the configuration of NUnit. You need to ensure that the client endpoints are set correctly in the config-file. By default they point to http://teamfoundation.

First step is to create a copy of the DefaultTemplate.xaml file, rename it to something – I called mine xUnitTemplate.xaml – and add it to TFS.

Open the new template in Visual Studio.

We need two arguments, one for the path to the xUnit console and one for the path to the NUnitTFS.exe.

Select Arguments and click Create Argument.

Create the two arguments: xUnit and TFSPublish.

Click the Arguments to close the list.

Select Variables and create one called XUnitResult. This will contain the output from one of the new processes we create.

Note the Variable Type and Scope.

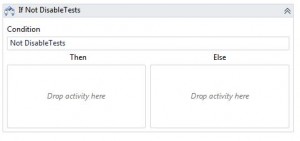
Now scroll down into the processes and locate the If Statement called If Not Disable Tests and the Sequence called Run Tests.

We want to delete the content of the Run Tests sequence and enter our own. Easiest way to do this is right click on Run Tests and select Delete. This will leave you with something like the following

Now from the Toolbox find the Sequence (located under Control Flow) and drop one on the Then box. Rename it to Run Tests.

Add an Invoke Process to the Sequence and name it Invoke xUnit Console.

The reason for the red exclamation marks is that we need to configure the new control. Open the properties and set the following:

  • Arguments: “xUnit.Test.dll /silent /nunit results.xml” (including quotes)
  • FileName: xUnit
  • Result: XUnitResult
  • WorkingDirectory: outputDirectory

As you can see we here have a hard coded value, namely the name of the assembly containing the unit tests. “It can be easily seen” as we used to say at University, when the math proof was too easy, so I will leave this as a small home assignment to you, my dear reader 🙂

You also want to add two activities to output the build messages and build errors (if any).

In the properties, set the Message to stdOutput and errOutput respectively.

We are almost done. Add a second Invoke Process under the newly created and name it e.g. Publish xUnit Results.

Set the Argument to the following:

String.Format(“-n {0} -t {1} -p “”{2}”” -f {3} -b “”{4}”” “,
“results.xml”,
BuildDetail.TeamProject,
BuildSettings.PlatformConfigurations(0).Platform,
BuildSettings.PlatformConfigurations(0).Configuration,
BuildDetail.BuildNumber)

And the FileName to TFSPublish  and WorkingDirectory to outputDirectory and lastly add two output handlers as above.

Save the template and check it in.

Next step is to create a new build definition that uses the new template.

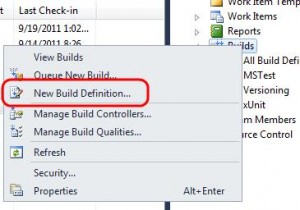
Open the Team Explorer, right click on Builds and select New Build Definition.

Set the name to something meaningful

And the Trigger to Continuous Integration

In Workspace, ensure that the folders you wish to include are active. Here we only got one.

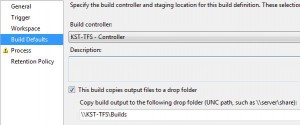
Under Build Defaults set the Build controller and the drop  folder. For this test I have just shared a drive on my TFS server.

Under Process we need to set the Build process template. Click on Show Details to expand the panel.

Click on New to  set the new template we have created earlier.

Select the Select an  existing XAML file and click on Browse…

Select the template we just created and press OK.

Press OK again to  get back to the initial screen (still under Process).

Under 4. Misc you  should see the two arguments we created. Enter the values as shown below.

If you are still seeing a yellow exclamation mark, it may be because you have to set the Configurations to build under 1. Required | Items to Build.

To test that this is actually working, create a solution and  add a class library to hold your unit tests. Remember to name the library  xUnit.Test (or rather ensure that the assembly is named xUnit.Test.dll).

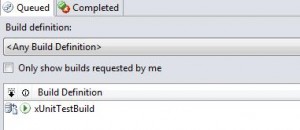
When you check in the test, the new build should commence.

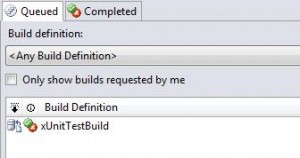
And when done the result is shown:

I made two small tests: one that would pass and one that would  not.

If you create a TFS report looking at the test runs (using ReportBuilder), you can see something like the following:

We are done!

A few things to note:

  • To get TFS to compile and run the tests using xUnit, I create a solution folder (e.g. called Lib) on the same level as my projects and add all the xUnit files to this folder. I then reference xunit.dll from this folder.
  • NUnitTFS seems to have changed from  the Alpha version, where it was possible to give an argument “-v”. This is not  longer possible with newer versions.
  • Be sure that the process running the build has access to the drop location.


Posted in Tips, UnitTest | Tagged , | 2 Comments

Dependency Injection in .NET by Mark Seemann

Yesterday I received the eBook of Dependency Injection in .NET, written by my good friend Mark aka @ploeh. I had the pleasure of serving as technical proofreader during production, hence the early edition.

If you have not already read it through the MEAP program, you are in for a treat. No matter if you are new to DI or an old rat this book will enlighten you, show you when and when not to use DI, the pit-falls, the tricks, basically everything you need to know to get started or continue your quest.

The book is very rich on extensive examples, not just the often used Hello World-kind, which does not really cut in the real world.

The official web site should be up shortly.

When the printed copy comes out, I will look forward to sit in my favorite chair in my library, with a good cup of coffee and a signed copy – right, Mark? 🙂 – and read it again.

Table of Contents:

Part 1 – Putting Dependency Injection on the map

  • A Dependency Injection tasting menu
  • A comprehensive example
  • DI Containers

Part 2 – DI catalog

  • DI patterns
  • DI anti-patterns
  • DI refactorings

Part 3 – DIY DI

  • Object Composition
  • Object Lifetime
  • Interception

Part 4 – DI Containers

  • Castle Windsor
  • StructureMap
  • String.NET
  • Autofac
  • Unity
  • MEF
Posted in Writing | Tagged | 1 Comment

HowTo: Install a SQL failover cluster (in a virtual lab environment)

I have a couple of times had to set up a SQL Server cluster, both at clients and in my own lab. At clients the underlying Windows cluster setup is often handled by their own infrastructure people, so this is seldom a problem – if we assume they know what they are doing, which I grant, is not always the case. However, as I don’t have an ops person standing around behind glass, to be called upon when I need her – it should of course be a her – I need to do it myself (reminds me of a saying I once heard: it is cheaper to do it yourself, but it is a lot more fun with someone else. Can’t remember what it was about …)

This blog post will describe the different steps required to create a small SQL Cluster with two nodes. The following is assumed:

  • You have a domain controller. Mine is running Windows Server 2008, but you can use an earlier version if you wish to have a small footprint.
  • You have installed Windows Server 2008 R2 on three servers. Two will be used for the cluster nodes and one as shared storage. All three servers have been joined to the domain and preferable been given a static IP-address.

Until Windows 8 I am running my lab using VirtualBox from Oracle. This allows me to run 64-bit virtual machines on my Windows 7 laptop, without having to boot into WS2008.

In summary we will construct the following:

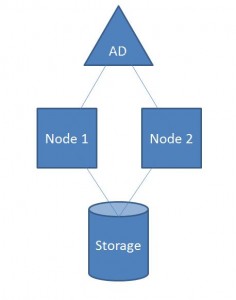
  • Two SQL2008R2 nodes running on WS2008R2
  • One WS2008R2 server used as shared storage.


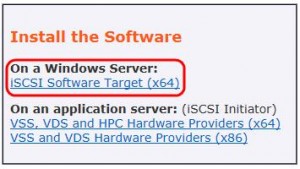
First thing to do is to create a Windows cluster. I use iSCSI and install the Microsoft iSCSI Software Target 3.3 on the storage box. There are other options. The important thing is, that you cannot create a SQL cluster, if the nodes are not able to see the same disk.

Run the install to unpack the files. This will open a web-page (index.htm). Select Install.


Accept all the default values and the install is completed swiftly.

Start the Microsoft iSCSI Software Target console.

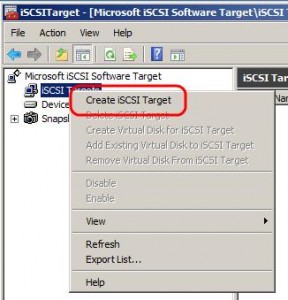
Select the iSCSI Target node, right click and select Create iSCSI Target.

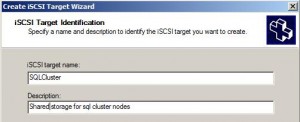
Enter a name for the iSCSI target and alternatively a description. Note, that the name cannot contain spaces.

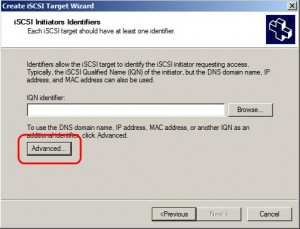
In the iSCSI Initiators Identifiers dialog, press the Advanced button.

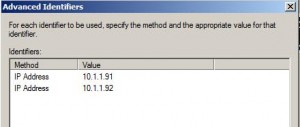
Enter the IP-address of the two nodes on which the SQL cluster will be installed.

Finish the target setup.

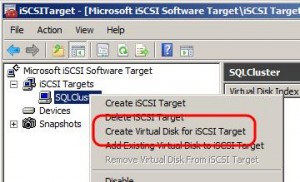
Right click the newly created iSCSI Target and select Create Virtual Disk for iSCSI Target.

Set location and size of virtual disk and finish the wizard. Upon completion you should see the newly created vdisk under the iSCSI target.


Next step is to connect the just created storage with the two cluster nodes.

On one of the nodes, open the Control Panel and select iSCSI Initiator.

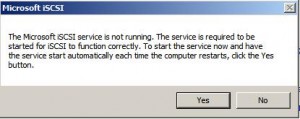
If you see the following dialog

just select Yes.

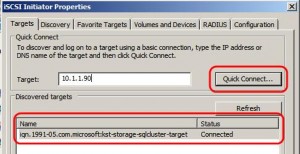
Enter the IP-address of the Storage box and press Quick Connect.

You should now see the storage server under Discovered targets.

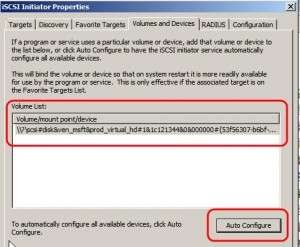
Go to the Volumes and Devices tab a press Auto Configure.

You should now see an entry under Volume List.

Click OK to close the iSCSI configuration.
Go to the second node and repeat the above steps.

Open the Server Manager and go to Storage and Disk Management. You should see the disk here.

Now go back to the first node, set the disk online and initialize it. This step will ensure that the disk is visible in the Cluster Manager when assigning disks.

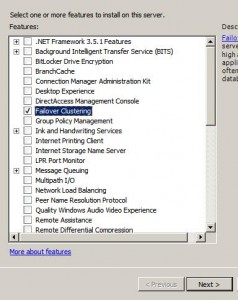
We now have the foundation to setup a Windows Cluster. Next step is to enable clustering on both nodes. Start the Server Manager on each node, select Features and Add Feature.

Check the Failvoer Clustering click Next and complete the setup.

On one of the nodes go to Start -> All Programs -> Administrative Tools and select Failover Cluster Manager.

Select Create a Cluster in the middle of the page.

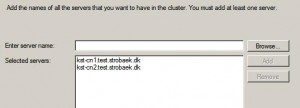
Add the two nodes to the list of servers that should be included in the cluster.

In the next step one can run a verification report. It will take some time to complete the report, but I recommend that it is done to avoid any needless frustration later on.

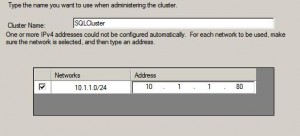
Give the cluster a name and an IP address.

Press Next and finish the setup.

To complete the setup the disk from before needs to be allocated or assigned to the cluster. Select Storage in the tree to the left and click Add a disk to the right.

This should display something similar to the following:


Press OK to continue.

So far so good. We now have the foundation on which we can install SQL Server.

SQL Sever 2008 R2 requires the .NET Framework 3.5. If you have not already done so, add it to your servers using the Server Manage and Add Feature.

On the node that “owns” the shared disk, run the installation. I know that it is not really correct to talk about ownership as it is the service that owns the resource and not the node itself, but I think you get the picture.
From the Installation Center, select Installation and then the second option New SQL Server failover cluster installation. The third option will be used to add node(s) to the cluster, once it has been set up.
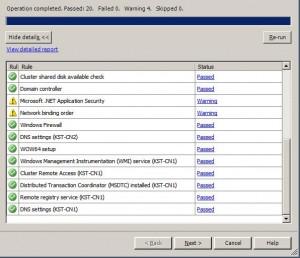
Continue through the dialogs until the Setup Support files are installed. Once this has completed a “report” is run to identify any issues. There should be no Red Lights, and only Yellow of no importance or  that can be rectified later, e.g. the network binding order.

On the Feature Selection page, select the features that should be installed and press Next.

On the Instanced Configuration page, a SQL Server Network Name must be specified. This is the “virtual” name applications will use to connect to.

Accept the default values for the Cluster Resource Group and the Cluster Disk Selection.

On the Cluster Network Configuration specify an IP-address.

Continue through the setup until the Database Engine Configuration.

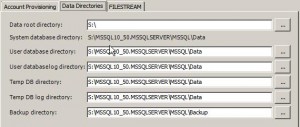
Supply the information for the Account Provisioning. On the Data Directories tab it can be seen that the shared or clustered drive has been selected. If you had multiple disks in your cluster and had selected them in the Cluster Disk Selected step, it would here be possible to place the data one one disk and the logs on another. For this test-lab all is installed on the same disk.
Continue with the configuration and end by pressing the Install button.

At this point it would be a good idea to get a cup of coffee as the installation might take some time.

Eventually something like this should be displayed

We have now configured and installed the first node in our failover SQL Cluster and we now just have to add the second node and we are done.

Start the install from the second node, select the Installation menu item, and as previous noted, select the third menu option Add node to a SQL Server failover cluster.

As before the installation process will begin by installing a number of setup files.

On the Cluster Node Configuration screen select the cluster to join.

Continue through the rest of the setup and press Install at the end.

If all goes well, the completion screen will be displayed.

That’s it! We now have a two node SQL failover cluster.

Posted in Tips | Tagged | 2 Comments

More on Grooming IIS Logs

I previously blogged about how to delete blob entries older than a given date.

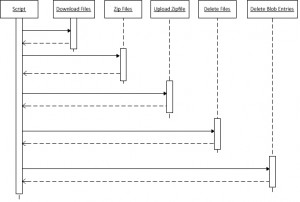
I have extended the script slightly to first download entries, zip then and upload them again to another storage container, before actually doing the removal. Before the deletion is carried out a simple check of file size is performed to ensure the upload succeced.

The sequence is illustrated below:

And the script:

function FileIsLocked( [string] $filePath )
{
    $script:locked = $false
    $fileInfo = New-Object System.IO.FileInfo $filePath
    trap
    {
        # if we are in here, the file is locked
        $script:locked = $true
        continue
    }
    $fileStream = $fileInfo.Open
[System.IO.FileMode]::OpenOrCreate,
[System.IO.FileAccess]::ReadWrite,
[System.IO.FileShare]::None )
if ($fileStream)
{
$fileStream.Close()
}
    $script:locked
}# Name of your account

$accountName = <Account Name> 

# Account key
$accountKey = <Account Key>
 

# Get current date on format YYYYMMDD, e.g. 20110906
$datePart = Get-Date -f “yyyyMMdd”

#Location of where blob entries should be downloaded to
$downloadLocation = “C:Temp” + $datePart

# Name of source and target storage container
$containerName = “wad-iis-logfiles”
$targetContainerName = “backup”

# Download and removed blob entries older than 90 days
$endTime = (get-date).adddays(-90)

# Download blob entries
Write-Host “Export-BlobContainer”
Export-BlobContainer
-Name $containerName
    -DownloadLocation $downloadLocation
    -MaximumBlobLastModifiedDateTime $endTime
    -AccountName $accountName
    -AccountKey $accountKey

# Zip files
Write-Host “Zip logfiles”
$zipFileName = $downloadLocation + “IISLog” + $datePart + “.zip”
set-content $zipFileName (“PK” + [char]5 + [char]6 + (“$([char]0)” * 18))
(dir $zipFileName).IsReadOnly = $false
$zipFile = (new-object -com shell.application).NameSpace($zipFileName)

$zipFile.CopyHere($downloadLocation)

Write-Host “Check if File is locked”
Start-Sleep -s 30
$fileIsLocked = FileIsLocked $zipFileName
Write-Host $fileIsLocked

while ($fileIsLocked)
{
    Write-Host “File Locked”
    Start-Sleep -s 30
    $fileIsLocked = FileIsLocked $zipFileName
}

# Upload zip-file
Write-Host “Import-File”
Import-File
-File $zipFileName
    -BlobContainerName $targetContainerName
    -CompressBlob
    -LoggingLevel “Detailed”
    -AccountName $accountName
    -AccountKey $accountKey

# Check if upload went well by comparing file size
$ext = “zip”
$timeTo = (Get-Date -f “yyyy-MM-dd”).ToString() + ” 23:59:59″
$timeFrom = (Get-Date -f “yyyy-MM-dd”).ToString() + ” 00:00:00″

$bfc = New-Object Cerebrata.AzureUtilities.ManagementClient.StorageManagementEntities.BlobsFilterCriteria
$bfc.BlobNameEndsWith = $ext
$bfc.LastModifiedDateTimeTo = $timeTo
$bfc.LastModifiedDateTimeFrom = $timeFrom

$blobInfo = Get-Blob
-BlobContainerName $targetContainerName
    -IncludeMetadata
    -BlobsFilterCriteria $bfc
    -AccountName $accountName
    -AccountKey $accountKey

$fileInfo = (New-Object IO.FileInfo “$zipFileName”)

if ($blobInfo.Size -eq $fileInfo.Length)
{
    # Delete downloaded files (and zip-file)
    Remove-Item -Recurse -Force $downloadLocation

    # Remove downloaded blob entries
    Remove-Blob
-BlobContainerName $containerName
        -BlobsFilterCriteria $bfc
        -AccountName $accountName
        -AccountKey $accountKey
}

Posted in Azure | Tagged | Leave a comment

Review of books: SOA patterns and PowerShell/WMI

I have recently read two manuscripts from Manning: SOA patterns by Rotem et all and PowerShell and WMI by Siddaway. None of them are published yet, but both are available through Mannings MEA program.

Like I have done previously I will try to write up a small review of each, but right now I do not have the bandwidth, so it will have to wait a little.

I can say that I found both books interesting. Howerver, PowerShell and WMI is not the most exciting subject, so this was somewhat difficult to get through. A lot of very good and usefull examples, though, which helped a lot.

Posted in Miscellaneous | Tagged | Leave a comment

Grooming Windows Azure Diagnostics Storage and IIS Logs

People working with Windows Azure are aware that the storage used for diagnostics will continue to grow perpetually if nothing is done about it.

With the introduction of the Windows Azure Management Pack – I call it WAMP; don’t know if it has an official acronym yet – System Center Operations Manager (SCOM) is able to groom the tables.

By default the following three rules are disabled in WAMP:

  • Windows Azure Role Performance Counter Grooming
  • Windows Azure Role .NET Trace Grooming
  • Windows Azure Role NET Event Log Grooming
    Once they have been enabled the rule will run on a periodic basis and will delete data from the relevant table older than T hours.

An online guide to WAMP is available here.

Unfortunately WAMP/SCOM does not come with a similar functionality to groom the IIS logs located in blob storage. By default these logs are written to the blob storage once every hour, so after a few months in production there are quite a number of them. And remember, that it is one log entry per instance.

The cost of storage is not very big, so it would be difficult to argue for an automated solution to groom the logs if price is the only parameter considered. However, as the number of entries grow it will take longer and longer to actually identify the relevant one.

To overcome this challenge one can write a small PowerShell script using e.g. the Azure Management Cmdlets developed by Cerebrata.

The script could look like the following:

# Name of your account
$accountName = <account name>
# Account key
$accountKey = <acount key># Name of container, e.g. wad-iis-logfiles
$containerName = <Container Name>
$lastModified = <UTC Date>

$bfc = New-Object Cerebrata.AzureUtilities.ManagementClient.StorageManagementEntities.BlobsFilterCriteria

$bfc.LastModifiedDateTimeTo = $lastModified

Remove-Blob -BlobContainerName $containerName
-BlobsFilterCriteria $bfc
-AccountName $accountName
-AccountKey $accountKey

The script will remove all blob entries older than the date given.

Posted in Azure | Tagged | 1 Comment

From the Trenches: SQL Cluster Installation

I recently had to install a SQL Server 2008 R2 cluster at a client. My previous experience was, that once the underlying Windows cluster and the shared storage, e.g. in form of a SAN have been set up, the installation of SQL server is relatively straight forward.

Well, not this time around.

Before you begin the installation of the SQL cluster, you can run some verifying tests of the Windows cluster. These were all green. During the SQL installation process all the Setup Support Rules are checked, and these were also all green.

The actual installation completed, but at the very end I got the following error:

image

Looking in the event log, the following error could be seen:

Cluster network name resource ‘SQL Network Name (BJSQCON)’ failed to create its associated computer object in domain ‘xxxx.com’ for the following reason: Unable to create computer account.

The text for the associated error code is: Access is denied.

“Access is denied”. This sounds like an AD problem, but the installing user should have all the required access rights (this at least according to the infrastructure team).

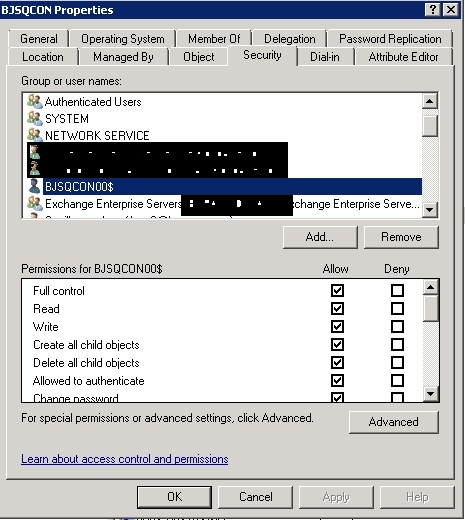
After some investigation I opened the (advanced) properties in AD for the computer object of the SQL cluster (sorry for the black; client confidentiality)

image

What was missing was the computer object for the Windows cluster, here shown after being added.

So after having pre-staged the AD, I removed the SQL node from the cluster and tried the installation again and this time all went fine.

Interested parties can read more about Failover Cluster setup and pre-staging here http://technet.microsoft.com/en-us/library/cc731002(WS.10).aspx#BKMK_steps_precreating

Posted in Tips | Tagged | Leave a comment

Review of book: Machine Learning in Action

My last review for Manning Publications Co. can’t have been all bad, because they asked me to do another one. The book this time is Machine Learning in Action by Peter Harrington and currently available in MEAP. The review is a so called “2/3” review as the book is not complete. I had the pleasure of reading chapters 1 through 10 as well as some of the appendixes.

Many years ago I did my Master thesis on the mathematical properties of artificial neural networks. I haven’t been working much in this area lately, so it was quite fun to “re-visit” some of the theory and applications used both in ANN and machine learning.

The book is very application oriented and gives some very good and illustrative examples of algorithms which can be used for classification, forecasting or unsupervised learning. It uses Python for all the code examples, but gives very good directions on how to install and use it, so if you are new to Python or have never used it before, this should not hinder you from getting value from the examples.

The author has included a lot of references to background material, enabling the reader to seek more information on areas of specific interest.

One area I find is a little weak is the handling or explanation of the underlying statistics. Machine learning is really just a form of Non-linear optimization and we know when these models are better then OLS (Ordinary Least Squares) or “regular” regression. If a certain set of conditions are met, the OLS estimate is the Maximum Likelihood (ML) estimate, and then we really can’t do any better. What this means is, that machine learning or neural networks or whatever we call it, will only be better if these conditions are not met.

One could fear, that the inexperienced user, would draw conclusions which on first sight would seem correct, but which would actually be wrong, because the underlying model was incorrect or the supplied data did not support it.

This being said, I found the book a very good read and a good introduction to Machine Learning.

Posted in Miscellaneous | Tagged | Leave a comment

Review of book: RabbitMQ in Action

I was asked to do the 2nd review on the book RabbitMQ in Action by Videla & Williams (Manning Publications Co.). Link here for those interested. The book is currently available in MEAP.

RabbitMQ is an efficient, highly scalable, and easy-to-deploy queue that makes handling message traffic virtually effortless.

The book started out with a really nice historical overview of message queues. It then continued to walk through different aspects of Rabbit, giving good examples and real life stories. The prose flows nicely and the authors are quite capable of keeping ones attention.

One importing thing to note: this is a book primarily for the Unix gang. If you have never played around with Unix or Linux and Python you will most likely not be able to run the examples. I only got chapters 1 through 8 and later chapters does promise to introduce java and .NET and look at how to install and run Rabbit on other platforms, but I have not read those chapters yet, so I cannot say how they are.

This said, the book is still very recommendable for those interested in learning more about Rabbit.

Posted in Miscellaneous | Tagged | Leave a comment

FTP from Windows Azure Blob Storage

In connection with migrating an old CMS system to Windows Azure, I have been playing around with Windows Azure Blob Storage. The CMS system was 10 years old and written in classic ASP, using a lot of local resources mainly the file system. I’ll try go write a blob post later on the few tweaks you  have to make to enable Windows Azure to execute classis ASP.

One feature of the old CMS system was, that you could use FTP to move files to be displayed on the site. Getting files into Blob storage is relatively easy; you can even mount a Blob container using it as a (network) drive.

A colleague asked me, if it was possible to FTP files out of Blob storage (something about moving very large movie files, and trigger the process on the Azure side).

It turned out to be relatively easy to do this.

We first set up the CloudStorageAccount and the CloudBlobClient

var blobStorage = CloudStorageAccount.FromConfigurationSetting("DataConnectionString");

var blobClient = blobStorage.CreateCloudBlobClient();

blobClient.RetryPolicy = RetryPolicies.Retry(4, TimeSpan.Zero);


Next we get a reference to the blob entry. For the sake of simplicity we hardcode the name, but you could of course loop through all entries like this


IEnumerable<IListBlobItem> blobs = container.ListBlobs();

if (blobs != null)

{

    foreach(var blobItem in blobs)

    {                   


and then handling each blobItem.


var containerName = "karstens";

CloudBlobContainer container = blobClient.GetContainerReference(containerName);

var fileName = "Windows Azure Platform.pdf";

var uniqueBlobName = string.Format("{0}/{1}", containerName, fileName);

CloudBlockBlob blob = blobClient.GetBlockBlobReference(uniqueBlobName);

Next we need to setup the FTP server. First some housekeeping; again, you would properly not hardcode this

var ftpServerIP = "<FTPSERVER>";

var ftpUserID = "<USERID>";

var ftpPassword = "<PASSWORD>";

var ftpFilename = "ftp://" + ftpServerIP + "//" + fileName;


To to the actual FTP transfer we use the FtpWebRequest class

FtpWebRequest ftpReq = (FtpWebRequest)WebRequest.Create(ftpFilename);

ftpReq.Method = WebRequestMethods.Ftp.UploadFile;

ftpReq.Credentials = new NetworkCredential(ftpUserID, ftpPassword);

If the files you with to transfer, remember to set the UseBinary property to true

ftpReq.UseBinary = true;


You may also have to turn off the Proxy for the FTP request. This is done by setting the Proxy property to null


ftpReq.Proxy = null;


Next step is to download the blob entry into a bytearray, set the length on the FTP request and write the file to the (ftp)stream

Byte[] b = blob.DownloadByteArray();

ftpReq.ContentLength = b.Length;

using (Stream s = ftpReq.GetRequestStream())

{

    s.Write(b, 0, b.Length);

}            


And we are done.

If you wish to automate this, you could have the WorkerRole monitor the Blob container and FTP any new items.

Posted in Azure | Tagged | 1 Comment