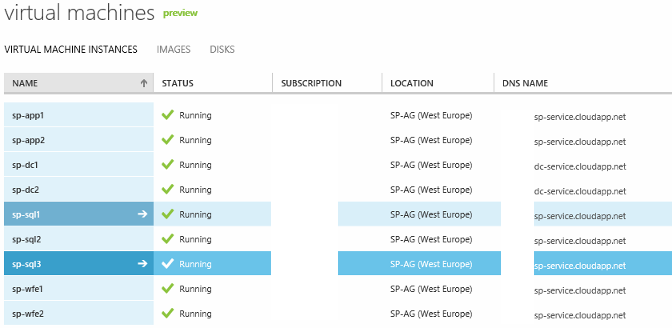
In this fifth post in the series on creating a SharePoint farm in Windows Azure we will look at the main script used to create the VMs.
For those who might have missed the previous posts they are:
- Creating a SharePoint Farm in Windows Azure
- Creating a Virtual Network in Windows Azure
- Creating a Base Image for use in Windows Azure
- Creating a DC/AD for use in Windows Azure
The script will automatically create and domain join the remaining 7 virtual machines required by our design: 2 web front-end servers, 2 application servers and 3 SQL Servers (one principal, one mirror and one witness).
An upcoming post will talk about the SQL Server installation, but just a few comments at this point. As described in the initial post, the SQL Servers are installed in a high-safety mode, that is the database mirroring session operates synchronously and uses a witness as well as the principal server and mirror server. For better performance mirroring can be enabled in high-performance mode where the database mirroring session operates asynchronously and uses only the principal server and mirror server. Note however, that the only form of role switching is forces service (with possible data loss).
To ensure we target the correct account we first set the active subscription:
# your imported subscription name
$subscriptionName = “MySubscription”
$storageAccount = “mystorageaccount”
Select-AzureSubscription $subscriptionName
Set-AzureSubscription $subscriptionName -CurrentStorageAccount $storageAccount
Next we set the Cloud Service Parameters. This is the “public” container holding all the VMs. It is also what allows up to load balance the two front-end servers as they will share the same VIP. Remember, that the service name must be unique, so SP-Service is most likely already taken.
# Cloud Service Parameters
$serviceName = “SP-Service”
$serviceLabel = “SP-Service”
$serviceDesc = “Cloud Service for SharePoint Farm”
Some more configuration options about base images and the virtual network.
# Image create in post: Creating a Base Image for use in Windows Azure
$spimage = ‘spbase100gbws2008r2’
$sqlimage = ‘base100gbsysprep’
$vnetname = ‘SP-VNET’
$subnetNameWFE = ‘SP-WFESubnet’
$subnetNameApp = ‘SP-AppSubnet’
$subnetNameSql = ‘SP-SqlSubnet’
$ag = ‘SP-AG’
$primaryDNS = ‘10.1.1.4’
As shown in the first post we will place the three layers (front-end, application and database) in three different availability sets.
# Availability Sets
$avset1 = ‘avset1’
$avset2 = ‘avset2’
$avset2 = ‘avset3’
The domain settings from when we configured the domain
# Domain Settings
$domain = ‘lab’
$joindom = ‘lab.azure’
$domuser = ‘administrator’
$dompwd = ‘P@ssw0rd’
$advmou = ‘OU=AzureVMs,DC=lab,DC=azure’
The location of the VHD-files
# MediaLocation
$mediaLocation = http://mystorageaccount.blob.core.windows.net/vhds/
Next we set the configuration for the different VMs. Please note, that I have just set the size to Small and Medium.
Also note, that I have defined a prope port and path for the two front-end servers. This is what the Load Balancer (LB) uses to check if traffic should be forwarded to the servers.
It will also be obvious, that I have only create/attached one extra disk to the SQL Servers. In a production setup you should not place data, log and temporary files on the same disk.
# Create SP WFE1
$size = “Small”
$vmStorageLocation = $mediaLocation + “sp-wfe1.vhd”
$spwfe1 = New-AzureVMConfig -Name ‘sp-wfe1’ -AvailabilitySetName $avset1 -ImageName $spimage -InstanceSize $size -MediaLocation $vmStorageLocation |
Add-AzureProvisioningConfig -WindowsDomain -Password $dompwd -Domain $domain -DomainUserName $domuser -DomainPassword $dompwd -MachineObjectOU $advmou -JoinDomain $joindom |
Add-AzureEndpoint -Name ‘http’ -LBSetName ‘lbhttp’ -LocalPort 80 -PublicPort 80 -Protocol tcp -ProbeProtocol http -ProbePort 80 -ProbePath ‘/healthcheck/iisstart.htm’ |
Set-AzureSubnet $subnetNameWFE
# Create SP WFE2
$size = “Small”
$vmStorageLocation = $mediaLocation + “sp-wfe2.vhd”
$spwfe2 = New-AzureVMConfig -Name ‘sp-wfe2’ -AvailabilitySetName $avset1 -ImageName $spimage -InstanceSize $size -MediaLocation $vmStorageLocation |
Add-AzureProvisioningConfig -WindowsDomain -Password $dompwd -Domain $domain -DomainUserName $domuser -DomainPassword $dompwd -MachineObjectOU $advmou -JoinDomain $joindom |
Add-AzureEndpoint -Name ‘http’ -LBSetName ‘lbhttp’ -LocalPort 80 -PublicPort 80 -Protocol tcp -ProbeProtocol http -ProbePort 80 -ProbePath ‘/healthcheck/iisstart.htm’ |
Set-AzureSubnet $subnetNameWFE
# Create SP App1
$size = “Small”
$vmStorageLocation = $mediaLocation + “sp-app1.vhd”
$spapp1 = New-AzureVMConfig -Name ‘sp-app1’ -AvailabilitySetName $avset2 -ImageName $spimage -InstanceSize $size -MediaLocation $vmStorageLocation |
Add-AzureProvisioningConfig -WindowsDomain -Password $dompwd -Domain $domain -DomainUserName $domuser -DomainPassword $dompwd -MachineObjectOU $advmou -JoinDomain $joindom |
Set-AzureSubnet $subnetNameApp
# Create SP App2
$size = “Small”
$vmStorageLocation = $mediaLocation + “sp-app2.vhd”
$spapp2 = New-AzureVMConfig -Name ‘sp-app2’ -AvailabilitySetName $avset2 -ImageName $spimage -InstanceSize $size -MediaLocation $vmStorageLocation |
Add-AzureProvisioningConfig -WindowsDomain -Password $dompwd -Domain $domain -DomainUserName $domuser -DomainPassword $dompwd -MachineObjectOU $advmou -JoinDomain $joindom |
Set-AzureSubnet $subnetNameApp
# Create SQL Server1
$size = “Medium”
$vmStorageLocation = $mediaLocation + “sp-sql1.vhd”
$spsql1 = New-AzureVMConfig -Name ‘sp-sql1’ -AvailabilitySetName $avset3 -ImageName $sqlimage -InstanceSize $size -MediaLocation $vmStorageLocation |
Add-AzureProvisioningConfig -WindowsDomain -Password $dompwd -Domain $domain -DomainUserName $domuser -DomainPassword $dompwd -MachineObjectOU $advmou -JoinDomain $joindom |
Add-AzureDataDisk -CreateNew -DiskSizeInGB 100 -DiskLabel ‘datalog’ -LUN 0 |
Set-AzureSubnet $subnetNameSql
# Create SQL Server 2
$size = “Medium”
$vmStorageLocation = $mediaLocation + “sp-sql2.vhd”
$spsql2 = New-AzureVMConfig -Name ‘sp-sql2’ -AvailabilitySetName $avset3 -ImageName $sqlimage -InstanceSize $size -MediaLocation $vmStorageLocation |
Add-AzureProvisioningConfig -WindowsDomain -Password $dompwd -Domain $domain -DomainUserName $domuser -DomainPassword $dompwd -MachineObjectOU $advmou -JoinDomain $joindom |
Add-AzureDataDisk -CreateNew -DiskSizeInGB 100 -DiskLabel ‘datalog’ -LUN 0 |
Set-AzureSubnet $subnetNameSql
# Create SQL Server 3 (Witness)
$size = “Medium”
$vmStorageLocation = $mediaLocation + “sp-sql3.vhd”
$spsql3 = New-AzureVMConfig -Name ‘sp-sql3’ -ImageName $sqlimage -InstanceSize $size -MediaLocation $vmStorageLocation |
Add-AzureProvisioningConfig -WindowsDomain -Password $dompwd -Domain $domain -DomainUserName $domuser -DomainPassword $dompwd -MachineObjectOU $advmou -JoinDomain $joindom |
Add-AzureDataDisk -CreateNew -DiskSizeInGB 100 -DiskLabel ‘datalog’ -LUN 0 |
Set-AzureSubnet $subnetNameSql
$dns1 = New-AzureDns -Name ‘dns1’ -IPAddress $primaryDNS
Last thing is to call New-AzureVM to actually create the VMs.
New-AzureVM -ServiceName $serviceName -ServiceLabel $serviceLabel `
-ServiceDescription $serviceDesc `
-AffinityGroup $ag -VNetName $vnetname -DnsSettings $dns1 `
-VMs $spwfe1,$spwfe2,$spapp1,$spapp2,$spsql1,$spsql2,$spsql3
Now go grab a cup of coffee and wait for your VMs to be provisioned, domain joined and started.
When done you should see something like the following in the PowerShell windows:
Looking in the portal:
In the next post we will look at how to set up the SQL servers in a mirror. Not really an Azure subject, but still something you what to do to ensure redundancy.


