As announced in my last post I will in a number of blog posts walk through the steps taken to create a SharePoint farm in Windows Azure.
This post will explain how to setup a Virtual Network (VNET) in Windows Azure. It can be done in a number of ways the two obvious ones being either through the portal or using PowerShell. I will concentrate on the later.
The following will assume you have a Windows Azure subscription. If not sign up for on.
It will also assume that you have downloaded and install the PowerShell cmdlets for Windows Azure. If not get them here.
You have to be very careful when creating or changing the VNET settings. There is currently no validation so if you mess up, you will potentially take the whole farm off line. I usually download the existing setting, make the required modifications and then apply the settings again.
In the script shown below, we will just apply the settings contained in an XML-file, so we assume the download-amend has taken place.
Let us first look at the VNET configuration. The table below shown the configuration as described in the introduction post.
| VNET Configuration |
| <NetworkConfiguration xmlns=”http://schemas.microsoft.com/ServiceHosting/2011/07/NetworkConfiguration” xmlns:xsi=”http://www.w3.org/2001/XMLSchema-instance” > <VirtualNetworkConfiguration> <Dns> <DnsServers> <!– List as many DNS servers as you need. –> <DnsServer name=”SP-DNS” IPAddress=”10.1.1.4″/> </DnsServers> </Dns> <LocalNetworkSites /> <VirtualNetworkSites> <VirtualNetworkSite name=”SP-VNET” AffinityGroup=”SP-AG”> <AddressSpace> <AddressPrefix>10.1.0.0/16</AddressPrefix> </AddressSpace> <Subnets> <Subnet name=”SP-ADSubnet”> <AddressPrefix>10.1.1.0/24</AddressPrefix> </Subnet> <Subnet name=”SP-AppSubnet”> <AddressPrefix>10.1.2.0/24</AddressPrefix> </Subnet> <Subnet name=”SP-WFESubnet”> <AddressPrefix>10.1.3.0/24</AddressPrefix> </Subnet> <Subnet name=”SP-SqlSubnet”> <AddressPrefix>10.1.4.0/24</AddressPrefix> </Subnet> </Subnets> <DnsServersRef> <!– This is needed to reference the DNS servers listed above –> <DnsServerRef name=”SP-DNS” /> </DnsServersRef> </VirtualNetworkSite> </VirtualNetworkSites> </VirtualNetworkConfiguration> </NetworkConfiguration> |
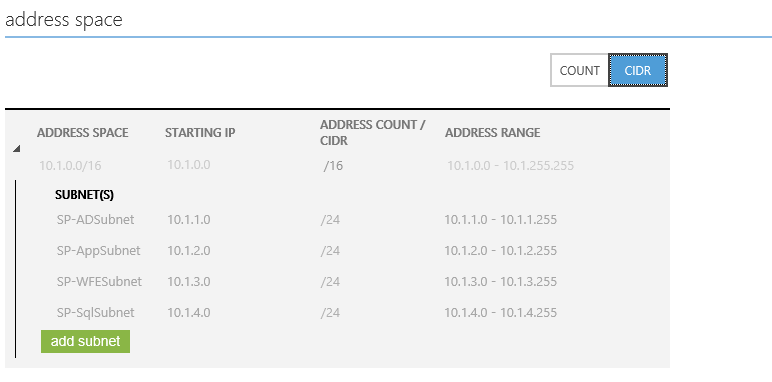
As you can see the address scope of the VNET is defined as well as the four subnets. We have also defined a DNS server. The reason we can do this and be sure of the IP-address even before we have deployed the actual DC-servers is due to the way Windows Azure allocate IP-addresses. Azure will reserve the first three in a subnet for internal use, so the first available one will always be .4. Because we have put the (two) domain controllers into their own subnet we know it will always have the IP-address 10.1.1.4.
The first thing you want to do is download the publishing settings for your subscription. Open an Internet Explorer browser and go to https://windows.azure.com/download/publishprofile.aspx.
Open an elevated Windows Azure PowerShell prompt.
If you have not executed any PowerShell before you may have to set the execution policy to RemoteSigned. This is done with the following command:
Set-ExecutionPolicy RemoteSigned
You import the publishing settings using the command:
Import-AzurePublishSettingsFile ‘[YOUR-PUBLISH-SETTINGS-PATH]’
You need the name of your subscription and it can be obtained with the following command:
Get-AzureSubscription | select SubscriptionName
You also need to decide in what data center your solution should be hosted. A list of the available locations can be found executing the command:
Get-AzureLocation | select displayname
We are now ready to create the VNET.
A few things to note. We first create a so called affinity group. Affinity groups are a way to physically group Windows Azure services together at the same data center to increase performance.
The name of the variable AGName must corresponded with the the attribute AffinityGroup in the XLM-file containing the VNET configuration.
The name of the storage account must be globally unique. You will get an error if you try to select one that is not available.
Now execute the following:
# Affinity Group parameters
$AGLocation = “West Europe”
$AGDesc = “Azure Affinity Group”
$AGName = “SP-AG”
$AGLabel = “SP-AG”
# Create a new affinity Group
New-AzureAffinityGroup -Location $AGLocation -Description $AGDesc `
-Name $AGName -Label $AGLabel
$storageAccount = “[Storage Account Name]”
$label = “SharePoint Storage Account”
# Create storage account
New-AzureStorageAccount -StorageAccountName $storageAccount `
-Label $label -AffinityGroup $AGName
# Your subscription name
$subscriptionName = “[Name of your subscription]”
Select-AzureSubscription $subscriptionName
Set-AzureSubscription $subscriptionName -CurrentStorageAccount $storageAccount
# Clear current settings
Remove-AzureVNetConfig -ErrorAction SilentlyContinue
# Apply new network
$configPath = (Split-Path -Path $MyInvocation.MyCommand.Definition -Parent) `
+ “\SharePointFarmVNET.xml”
Set-AzureVNetConfig -ConfigurationPath $configPath
You can check the result by the following command:
# Get-AzureVNetConfig | Select -ExpandProperty XMLConfiguration
Or you can log into the management portal. If all went well you should see something along the lines of:
In the next post we will create the base image(s) and extend the OS-drive from the default 30 GB to 100 GB.


